🔓 Get All Tools for FREE!
- ✅ Click here to open a trading account using our referral link and start trading.
- 📅 After 7 days of active trading under our referral link, you can get access to all tools in your account.
- ⚠️ Keep trading to keep access free — if you're inactive for 7 days, your access will be removed.
- 👉 Already have an account? You can change the IB (introducing broker) to our referral link ( https://one.exnesstrack.org/a/w7syl3vnjb ) and still qualify!
In today’s fast-paced financial markets, automated indicators are game-changers for traders looking to optimize their trading strategies. Imagine an indicator that not only alerts you to the best entry points but also guides you with stop-loss and take-profit levels. This is exactly what our 10 EMA-based trading indicator accomplishes, making it ideal for forex, crypto, and stock trading alike. This guide will cover what this indicator is, how it works, and the rules that make it a powerful tool in trading.
What is this Indicator?
This 10 EMA-based trading indicator is designed to simplify trading by automating key signals that support profitable entry and exit points. It works across multiple markets, including forex, crypto, and stocks, making it highly versatile. The indicator uses the 10-period Exponential Moving Average (EMA) to analyze price action, pinpointing moments when buying or selling conditions are optimal. With clear visual cues, traders can effortlessly follow structured entry and exit points, knowing exactly where to set their stop-loss and take-profit levels. Additionally, the indicator includes an optional trailing stop feature to help traders lock in profits as the trend progresses.
🔓 Get All Tools for FREE!
- ✅ Click here to open a trading account using our referral link and start trading.
- 📅 After 7 days of active trading under our referral link, you can get access to all tools in your account.
- ⚠️ Keep trading to keep access free — if you're inactive for 7 days, your access will be removed.
- 👉 Already have an account? You can change the IB (introducing broker) to our referral link ( https://one.exnesstrack.org/a/w7syl3vnjb ) and still qualify!
For traders at all levels, this indicator minimizes the complexity of managing trades and maximizes the potential for profit. By using this tool, traders can avoid emotional trading, stay disciplined with their trades, and follow a robust, data-driven strategy.
Key Features and Benefits
- Automated Signals for Simplified Trading: This indicator automatically generates buy and sell signals, making it easy for traders to spot ideal entry points.
- Multi-Market Application: Use it in any market you prefer—whether it’s forex, crypto, or stocks.
- Dynamic Stop-Loss and Take-Profit Lines: Automatically generated lines guide traders to set their risk levels precisely.
- Trailing Stop Option: The trailing stop follows the 10 EMA, securing profits as trends move in your favor.
- Risk Management: Ensures disciplined trading with a 1:2 risk-reward setup.
These features make it easier for traders to follow a systematic approach that balances opportunities with a solid risk management strategy.
How Does the Indicator Work?
This indicator uses price movement relative to the 10 EMA to signal entry and exit points. Below is a breakdown of the logic behind the buy and sell signals, as well as how stop-loss, take-profit, and trailing stop are implemented:
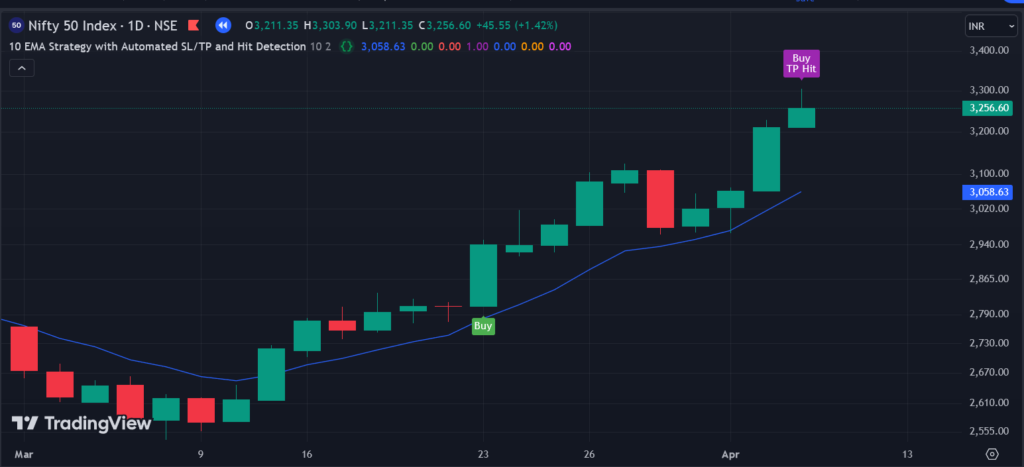
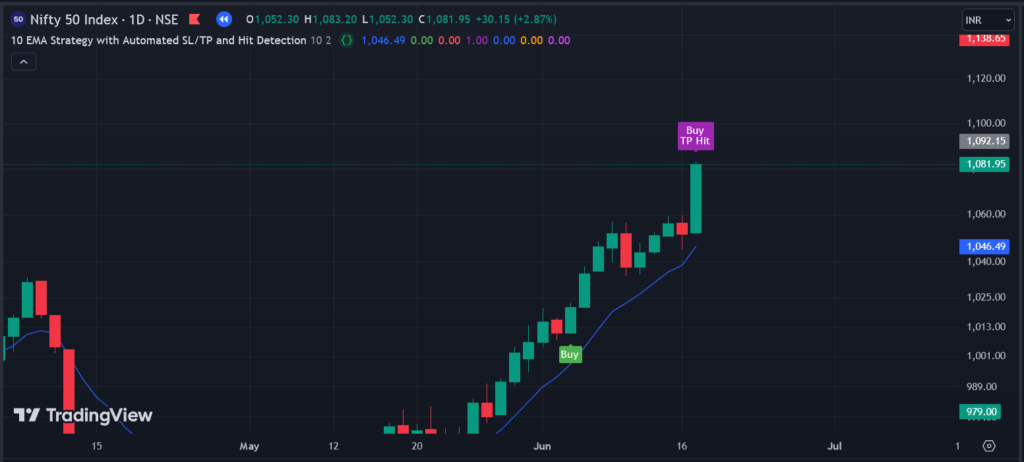
1. Buy Signal Logic:
- The indicator starts looking for a buy signal when bullish candles form above the 10 EMA.
- A crucial condition is that a red (bearish) candle should appear without touching the 10 EMA.
- If the following candle breaks above the high of this red candle, a buy signal is triggered. This entry setup ensures that you’re entering the trade when momentum is most likely to move in your favor.
2. Sell Signal Logic:
- The sell setup mirrors the buy logic but in the opposite direction.
- For a sell signal, bearish candles should form below the 10 EMA.
- Next, a green (bullish) candle appears without touching the 10 EMA. This setup suggests a temporary price pullback.
- When the next candle breaks below the low of the green candle, the indicator generates a sell signal.
3. Stop-Loss and Take-Profit:
- The stop-loss is automatically set at the 10 EMA, which adapts as the market moves. This dynamic stop-loss line helps traders stay protected against unexpected reversals.
- A minimum 1:2 risk-reward ratio is applied, ensuring that potential profit is at least twice the potential loss. This aspect promotes a structured risk management approach that encourages long-term profitability.
4. Trailing Stop:
- Traders can enable an optional trailing stop that follows the 10 EMA. As the trend develops, the trailing stop locks in profits. If the trend reverses, this trailing mechanism ensures that a portion of your profit is protected.
Why the 10 EMA?
The 10 EMA is a popular choice for capturing short-term price trends. It responds quickly to recent price changes, making it ideal for identifying fresh buying or selling opportunities. The 10 EMA serves as both a trend filter and a dynamic support/resistance line, making it an effective tool in automated trading strategies.
How to Use the Indicator in Your TradingView Chart
To effectively utilize this indicator on TradingView, follow these steps:
- Install the Indicator: If available in the public library or provided by the creator, add it to your TradingView chart.
- Observe Market Conditions: Confirm that bullish or bearish trends align with the 10 EMA before entering a trade.
- Wait for a Pullback: Look for the specific candle pattern—a red candle above the 10 EMA for buys, and a green candle below the 10 EMA for sells.
- Confirm Entry Signal: Once the next candle breaks the designated high or low, enter the trade.
- Follow Stop-Loss and Take-Profit Guidelines: Set the stop-loss at the 10 EMA, with a take-profit based on a 1:2 risk-reward ratio.
- Enable Trailing Stop (Optional): If you wish to lock in profits as the trade moves in your favor, activate the trailing stop option to follow the 10 EMA.
By following these steps, you’ll be able to execute trades confidently and with a disciplined approach.
Advantages of Using This Indicator
- Reduces Emotional Trading: Automated entry and exit signals keep traders disciplined.
- Supports Multiple Markets: Suitable for forex, crypto, and stocks, providing traders with flexibility.
- Effective Risk Management: With built-in stop-loss and take-profit suggestions, the indicator promotes safer trading.
- Trailing Stop for Profit Protection: The optional trailing feature helps capture more gains in strong trends.
Contact us at +91 7620658346 for access to this indicator. We offer algo development for TradingView indicators, MT4/MT5, and trading bots.
Follow us on Instagram, YouTube, and Twitter @algo_aakash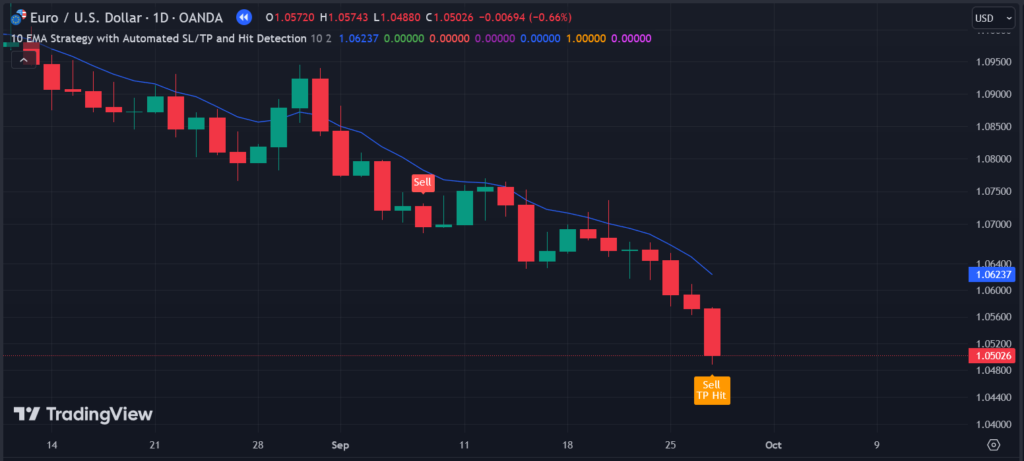
Conclusion
This 10 EMA-based indicator is a valuable asset for traders looking to automate entry and exit points across various markets, including forex, crypto, and stocks. By following structured rules for buy and sell signals, along with built-in stop-loss, take-profit, and optional trailing stops, this indicator enhances trading precision and efficiency. With a focus on maintaining disciplined trading and managing risk, this tool can help traders achieve more consistent results while reducing emotional decision-making. As part of a well-rounded strategy, this indicator allows traders to take advantage of short-term trends with a clear, data-driven approach.
Disclaimer
This indicator is designed to support trading strategies but does not guarantee profits or eliminate risks. Trading in financial markets involves substantial risk, including the risk of loss. This tool should be used in conjunction with thorough market analysis and risk management practices. Users should not rely solely on this indicator for decision-making and should understand the inherent risks of trading in volatile markets like forex, crypto, and stocks. Past performance is not indicative of future results. Always consult with a financial advisor if unsure about any trading activity.
0 Comments