🔓 Get All Tools for FREE!
- ✅ Click here to open a trading account using our referral link and start trading.
- 📅 After 7 days of active trading under our referral link, you can get access to all tools in your account.
- ⚠️ Keep trading to keep access free — if you're inactive for 7 days, your access will be removed.
- 👉 Already have an account? You can change the IB (introducing broker) to our referral link ( https://one.exnesstrack.org/a/w7syl3vnjb ) and still qualify!
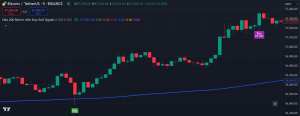
In the world of technical analysis, identifying key trends and spotting optimal entry and exit points are critical to successful trading. The “EMA 200 Retest with Buy/Sell Signals” indicator provides a powerful tool for traders looking to use long-term trends in their strategies. This indicator, built on the 200-period Exponential Moving Average (EMA), simplifies decision-making by providing clear buy and sell signals based on how the price interacts with the EMA. Moreover, it incorporates dynamic stop-loss (SL) and take-profit (TP) levels, ensuring a comprehensive approach to risk management and trade execution.
In this detailed guide, we’ll explore how the EMA 200 Retest indicator works on TradingView, its components, and why it’s a must-have tool for traders of all levels. Additionally, this content is optimized for search engines to help readers discover valuable insights on using the EMA 200 trading strategy for enhanced profitability.
What is the EMA 200 Retest with Buy/Sell Signals Indicator?
The EMA 200 Retest with Buy/Sell Signals indicator is a technical analysis tool specifically designed for trend-following traders. It calculates the 200-period Exponential Moving Average (EMA) and generates buy and sell signals when the price interacts with the EMA. Traders use this interaction to gauge the market’s direction and time their trades.
🔓 Get All Tools for FREE!
- ✅ Click here to open a trading account using our referral link and start trading.
- 📅 After 7 days of active trading under our referral link, you can get access to all tools in your account.
- ⚠️ Keep trading to keep access free — if you're inactive for 7 days, your access will be removed.
- 👉 Already have an account? You can change the IB (introducing broker) to our referral link ( https://one.exnesstrack.org/a/w7syl3vnjb ) and still qualify!
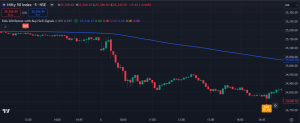
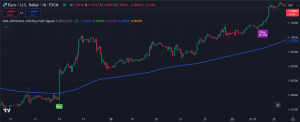
The 200-period EMA is a popular long-term trend indicator. It smooths out price data over a specified period, giving traders a clear visual of the overall market trend. When the price is above the EMA, it signals a bullish trend, and when below, it signals a bearish trend. The “retest” element refers to the price pulling back to the EMA and bouncing off it, which can provide a high-probability entry point for traders.
Mastering the EMA 200 Retest with Buy/Sell Signals Indicator: A Comprehensive Guide for Traders
How the EMA 200 Retest Indicator Works on TradingView
Let’s break down how the EMA 200 Retest with Buy/Sell Signals indicator works on the TradingView platform and how you can use it to make better trading decisions.
1. EMA 200 Calculation
The first task of the script is to plot the 200-period Exponential Moving Average (EMA 200) on the chart. This line helps to smooth out price fluctuations and provides a clear indication of the long-term trend. The EMA reacts faster to price changes compared to a Simple Moving Average (SMA) due to its emphasis on recent data points, making it ideal for traders seeking responsive trend analysis.
2. Buy Signal
A buy signal is generated when the price crosses above the EMA 200 or when it retests the EMA from above after a temporary pullback. This interaction signals that the market is likely to continue its uptrend, providing a potential buying opportunity. The script automatically marks the buy signal with a green arrow or other visual cues, making it easy to spot on the chart.
3. Sell Signal
Conversely, a sell signal is triggered when the price crosses below the EMA 200 or when it retests the EMA from below during a downtrend. This suggests the market may continue its bearish momentum, making it a good time to sell or open a short position. The indicator marks these sell signals with a red arrow or visual label, providing clear guidance to traders.
4. Stop-Loss (SL) and Take-Profit (TP) Levels
The indicator includes a critical risk management feature: dynamic stop-loss (SL) and take-profit (TP) levels. These levels are calculated as a percentage of the closing price and are plotted directly on the chart for easy visualization. Traders can adjust the percentage according to their risk tolerance and strategy.
- Stop-Loss (SL) Levels: After a buy signal, the SL level is set below the entry point to protect against downside risk. For sell signals, the SL is placed above the entry point. These levels help mitigate losses if the trade moves in the wrong direction.
- Take-Profit (TP) Levels: The TP level is set at a calculated distance from the entry point, based on price volatility or user-defined parameters. The TP ensures that traders lock in profits when the market moves favorably.
5. Signal Visuals and Hit Labels
To enhance usability, the indicator offers clear visuals for the buy and sell signals, as well as SL and TP levels. Additionally, the script displays hit labels when either the stop-loss or take-profit conditions are met. This helps traders monitor the outcome of their trades in real-time, providing an efficient way to track performance without constantly recalculating or manually adjusting levels.
Key Advantages of the EMA 200 Retest Indicator
The EMA 200 Retest with Buy/Sell Signals indicator offers multiple benefits that cater to both novice and experienced traders:
1. Clear Trend Identification
One of the biggest challenges traders face is determining the overall market direction. The 200-period EMA is widely regarded as one of the best tools for identifying long-term trends. By following the price’s relationship to the EMA, traders can easily distinguish between bullish and bearish markets, ensuring they stay aligned with the prevailing trend.
2. Accurate Entry and Exit Points
The buy and sell signals generated by the indicator are based on specific price interactions with the EMA. This provides traders with clear, actionable signals, reducing the guesswork involved in timing entries and exits. Additionally, the retest of the EMA offers a higher probability of success by confirming the trend before entering a trade.
3. Built-In Risk Management
Risk management is a fundamental aspect of successful trading, and the EMA 200 Retest indicator simplifies this by including automatic SL and TP levels. Traders no longer need to manually calculate their risk levels or adjust their trades, as the indicator plots these points on the chart. This helps reduce emotional decision-making and ensures consistent risk management across trades.
4. User-Friendly Visuals
The visual cues provided by the buy/sell signals, SL, TP levels, and hit labels make the indicator extremely easy to use. Traders can quickly glance at the chart to understand the current market conditions, signal status, and whether their trades are still active or have been closed.
5. Customizable for Different Trading Styles
The EMA 200 Retest indicator can be tailored to fit various trading styles and timeframes. Whether you’re a day trader, swing trader, or position trader, the indicator works on different chart intervals—from short-term intraday setups to longer-term daily or weekly charts.
How to Maximize the EMA 200 Retest Indicator
To get the most out of the EMA 200 Retest with Buy/Sell Signals indicator, here are some best practices:
- Combine with Other Indicators: For increased accuracy, consider pairing the EMA 200 Retest with other technical indicators like the Relative Strength Index (RSI), Moving Average Convergence Divergence (MACD), or Stochastic Oscillator. This helps confirm signals and reduces the likelihood of false entries.
- Multiple Timeframe Analysis: Use the EMA 200 on higher timeframes (e.g., daily or weekly) to confirm long-term trends, while applying the indicator on lower timeframes (e.g., 15-minute or 1-hour) for precise trade entries.
- Keep an Eye on Key Support and Resistance Levels: Plot significant support and resistance zones in conjunction with the EMA to further strengthen your analysis. This helps ensure your buy and sell signals align with critical price levels.
Mastering the EMA 200 Retest with Buy/Sell Signals Indicator: A Comprehensive Guide for Traders
//@version=5
indicator(“EMA 200 Retest with Buy/Sell Signals”, overlay=true)
// Input for Stop Loss and Take Profit Percentage
stopLossPerc = input.float(1, title=”Stop Loss %”, minval=0.001, step=0.001)
takeProfitPerc = input.float(2, title=”Take Profit %”, minval=0.001, step=0.001)
// Calculate EMA 200
ema200 = ta.ema(close, 200)
// Condition: Price is above EMA 200 (Uptrend) but touches EMA 200
priceAboveEMA200 = close > ema200
priceTouchesEMA200 = low <= ema200 and close > ema200
// Condition: Price is below EMA 200 (Downtrend) but touches EMA 200
priceBelowEMA200 = close < ema200
priceRetestsEMA200FromBelow = high >= ema200 and close < ema200
// Buy Signal: Price retests EMA 200 from above (after an uptrend)
buy = ta.crossover(close, ema200) or priceTouchesEMA200
// Sell Signal: Price retests EMA 200 from below (after a downtrend)
sell = ta.crossunder(close, ema200) or priceRetestsEMA200FromBelow
// Plotting EMA 200
plot(ema200, color=color.blue, linewidth=2, title=”EMA 200″)
// Variables to handle buy/sell triggers and SL/TP logic
var buyTrigger = true
var sellTrigger = true
var buy_sl = 0.0
var buy_tp = 0.0
var sell_sl = 0.0
var sell_tp = 0.0
var line lineSL = na
var line lineTP = na
// Check for Stop Loss and Take Profit hits
buy_sl_hit = (ta.crossunder(low, buy_sl) or low <= buy_sl) and buy_sl > 0
buy_tp_hit = (ta.crossover(high, buy_tp) or high >= buy_tp) and buy_tp > 0
if buy_sl_hit or buy_tp_hit
buy_sl := 0
buy_tp := 0
line.delete(lineSL)
line.delete(lineTP)
sell_sl_hit = (ta.crossover(high, sell_sl) or high >= sell_sl) and sell_sl > 0
sell_tp_hit = (ta.crossunder(low, sell_tp) or low <= sell_tp) and sell_tp > 0
if sell_sl_hit or sell_tp_hit
sell_sl := 0
sell_tp := 0
line.delete(lineSL)
line.delete(lineTP)
// Plot Buy and Sell signals
plotshape(buy, style=shape.labelup, location=location.belowbar, color=color.green, size=size.tiny, title=”Buy”, text=”Buy”, textcolor=color.white)
plotshape(sell, style=shape.labeldown, location=location.abovebar, color=color.red, size=size.tiny, title=”Sell”, text=”Sell”, textcolor=color.white)
// Handle SL/TP for Buy
if buy
buyTrigger := false
sellTrigger := true
buy_sl := close * (1 – stopLossPerc) // SL as percentage of close price
buy_tp := close * (1 + takeProfitPerc) // TP as percentage of close price
sell_sl := 0
sell_tp := 0
line.delete(lineSL)
line.delete(lineTP)
lineSL := line.new(bar_index, buy_sl, bar_index + 10, buy_sl, color=color.red)
lineTP := line.new(bar_index, buy_tp, bar_index + 10, buy_tp, color=color.green)
// Handle SL/TP for Sell
if sell
sellTrigger := false
buyTrigger := true
buy_sl := 0
buy_tp := 0
sell_sl := close * (1 + stopLossPerc) // SL as percentage of close price
sell_tp := close * (1 – takeProfitPerc) // TP as percentage of close price
line.delete(lineSL)
line.delete(lineTP)
lineSL := line.new(bar_index, sell_sl, bar_index + 10, sell_sl, color=color.red)
lineTP := line.new(bar_index, sell_tp, bar_index + 10, sell_tp, color=color.green)
// Extend SL/TP lines
if barstate.islast
line.set_x2(lineSL, bar_index + 10)
line.set_x2(lineTP, bar_index + 10)
// Plot Stop Loss and Take Profit hit labels
plotshape(buy_tp_hit, style=shape.labelup, location=location.belowbar, color=color.purple, size=size.tiny, title=”Buy TP Hit”, text=”Buy\nTP Hit”, textcolor=color.white)
plotshape(buy_sl_hit, style=shape.labeldown, location=location.abovebar, color=color.blue, size=size.tiny, title=”Buy SL Hit”, text=”Buy\nSL Hit”, textcolor=color.white)
plotshape(sell_tp_hit, style=shape.labelup, location=location.belowbar, color=color.orange, size=size.tiny, title=”Sell TP Hit”, text=”Sell\nTP Hit”, textcolor=color.white)
plotshape(sell_sl_hit, style=shape.labeldown, location=location.abovebar, color=color.fuchsia, size=size.tiny, title=”Sell SL Hit”, text=”Sell\nSL Hit”, textcolor=color.white)
Mastering the EMA 200 Retest with Buy/Sell Signals Indicator: A Comprehensive Guide for Traders
Conclusion: A Reliable Indicator for Trend Trading
The EMA 200 Retest with Buy/Sell Signals indicator is an invaluable tool for traders looking to capitalize on long-term market trends. By providing clear signals, automatic stop-loss and take-profit levels, and user-friendly visuals, the indicator simplifies the decision-making process. Whether you’re a seasoned trader or just starting out, incorporating the EMA 200 Retest indicator into your strategy can improve your trading outcomes, especially when combined with sound risk management practices.
Disclaimer:
The content provided is for informational purposes only and does not constitute financial or trading advice. Trading involves risk, and you should carefully consider your financial situation and consult with a professional before making any decisions. Past performance is not indicative of future results.
🔓 Get This Tool for FREE!
- ✅ Click here to open a trading account using our referral link and start trading.
- 💡 Use coupon code: FREE during checkout.
- 📅 After 7 days of active trading under our referral link, you’ll get access to this tool in your account.
- ⚠️ Keep trading to keep access free — if you're inactive for 7 days, your access will be removed.
- 👉 Already have an account? You can change the IB (introducing broker) to our referral link and still qualify!

0 Comments